

Battered by the Third Battle of Ypres and shocked by the reversal at Cambrai, the British Expeditionary Force (BEF) and its commander were under considerable strain by the dawn of 1918. The BEF had played an increasingly large role in the war since the Somme battle of 1916 and had suffered great losses in terms of men and materiel, but nowhere in France or Flanders was there a clear and consistent sign that its sacrifices had weakened the Germans beyond recovery. This lack of evidence created the conditions for the wholesale re-examination of British strategy so desired by Lloyd George and others sceptical that the Western Front offered the potential for decisive victory. Desperate to impose civilian and, more particularly, his own authority over the shape of British strategy, Lloyd George used the lack of success in the battles of Ypres and Cambrai against Haig and Robertson. For Lloyd George, the moment had come to curb the influence of the British Army’s two most important generals in order to ensure a comprehensive reappraisal of Britain’s position and the state of the war. Unfortunately for the BEF, Lloyd George’s review came at a moment when the significance of the Western Front was greater than ever. With Ludendorff determined to wage a final, decisive campaign in the west, the men of the BEF required clarity of thought from their political and military masters. Unused to the concept of the strategic defensive, the BEF needed careful preparation, mental and physical, for the role. It could not afford the luxury of a protracted debate over its mission in France and Flanders.Footnote 1
Although Haig was aware of Lloyd George’s increasing disquiet over the lack of progress in the Third Ypres campaign, it was the failure of Cambrai that precipitated the crisis in the relationship between Lloyd George and the Haig-Robertson partnership. Lloyd George was particularly angry at the success of the German counter-attack at Cambrai, for it had been claimed that the Germans had no surplus manpower after being severely stretched at Passchendaele. It was compounded by the fact that intelligence reports suggested that the Germans had not yet transferred much in the way of manpower from the Eastern Front. With British civil–military relations now very much strained, Lloyd George hoped to use the Cambrai debacle to oust both Robertson and Haig while at the same time outflanking them by using the new Supreme War Council established at Versailles as an alternative focus for strategic discussion, advice and planning. The Secretary of State for War, Lord Derby, was not willing to play a role in such a move, but he was prepared to remove some of Haig’s General Headquarters (GHQ) staff. As Lloyd George realised that he was unable easily to topple Haig, the option of purging his closest associates at GHQ seemed the best way of curbing his power. Indeed, while Lloyd George canvassed names of potential successors to Haig in January 1918, the South African statesman sitting in the War Cabinet, Jan Smuts, and its secretary, Maurice Hankey, could only suggest Lieutenant-General Claud Jacob of II Corps, although Plumer and Rawlinson were also mentioned.Footnote 2
It was against this background that Byng completed his preliminary report on the Cambrai reverse. He stated that Third Army HQ had been expecting a German counter-attack and put the blame for failure onto his front-line soldiers: ‘I attribute the reason for the local success on the part of the enemy to one cause and one alone, namely – lack of training on the part of junior officers and NCOs and men.’Footnote 3 Despite Byng’s reluctance to accept that any of the higher commanders were to blame, over the next three months all three corps commanders involved were removed from their posts (Snow, Woollcombe and Pulteney). For all his many strengths as a commander, Byng’s actions rather tarnish his reputation, as it seems unfair and inaccurate to blame the men under his authority for failures he and his own staff could have avoided through more effective action.Footnote 4
But it can be argued that the real problem was at GHQ. Once again, Haig’s intelligence chief, Charteris, had totally misunderstood the strength and intentions of the Germans on this section of the front and therefore provided no kind of advance warning. He deliberately suppressed evidence of the arrival of a German division before the battle, apparently so as not to deter Haig from his intention to attack. This failure of interpretation and effective communication was a hallmark of Charteris’ relationship with Haig. Rumours of this unbalanced and inefficient collaboration had spread widely, and it made Charteris vulnerable to a Prime Minister increasingly irate at the perceived weaknesses of GHQ.Footnote 5 Charteris was duly removed and replaced by Sir Herbert Lawrence, formerly the commander of 66th (East Lancashire) Division. A second high-profile casualty was the Quartermaster-General, Sir Ronald Maxwell, who had long since lost the confidence of those familiar with the BEF’s earlier logistics problems, if not that of Haig. Maxwell’s poor health was used as an excuse to remove him, and Lieutenant-Colonel Sir Travers Clarke replaced him.Footnote 6 Other important new appointments were the able Brigadier-General John Dill as Director of Military Operations and Major-General Guy Dawnay as Head of the Staff Duties Section.
The final adjustment was the replacement of Lancelot Kiggell, Haig’s Chief of Staff. Somewhat ironically, Kiggell fell just at the moment when he had become a convert to the methodical, step-by-step battle under the guidance of his colleague, ‘Tavish’ Davidson, Dill’s predecessor as Director of Military Operations at GHQ. This had caused him to doubt Gough’s approach at Third Ypres and make efforts to contain the visions of the Fifth Army commander. However, he had never been particularly robust in his dealings with Haig and by December 1917 was clearly in a state of poor health. Derby warned Haig about Kiggell’s condition, but he seemed reluctant to take this hint. When Haig finally relented, he indicated that he would like to promote Butler, Kiggell’s deputy, but Derby refused to accept this idea doubtless because Butler was regarded as an equally malleable replacement. The need to replace Kiggell then caused further disruption at GHQ, for the newly appointed Lawrence was regarded as the best man for the job. He therefore left his position as Intelligence Chief to be replaced by Brigadier-General Edgar Cox, who was Deputy Head of Intelligence at the War Office. The extremely capable Cox was to suffer enormous strain during the German spring offensives and drowned while swimming alone off Berck Plage on 26 August 1918. He was replaced in mid-September by Sidney Clive.Footnote 7
Whether this new staff team was the powerhouse that stabilised the BEF in the crisis moments of the German spring offensive and brought it to victory during the Hundred Days can be debated, but it certainly fulfilled Lloyd George’s desire to bring greater rigour to Haig’s GHQ relationships. This was particularly true in the case of Sir Herbert Lawrence. Son of a Viceroy of India and a former cavalryman, Lawrence had resigned from the army in 1903 over his lack of promotion and subsequently became a highly successful businessman. He re-joined the army in 1914 and gained a good reputation as a commander before proceeding to GHQ. These attributes gave him the self-confidence to engage with Haig more robustly than his predecessor.Footnote 8
Lloyd George did not stop at this rearrangement of GHQ. Continuing the tactic of focusing on close collaborators, he turned his attention to Robertson. Believing that Robertson deliberately undermined comprehensive discussion of British strategy, Lloyd George worked hard to invest more executive power in the Supreme War Council. He was particularly keen to create an entente General Reserve under the direction of General Foch. Seeing this as a move designed deliberately to undermine the post of Chief of the Imperial General Staff (GIGS), Robertson resigned and was replaced by Sir Henry Wilson. This turned out to be a pyrrhic victory for Lloyd George for two reasons. Firstly, the Haig-Robertson relationship was nowhere near as strong and mutually supportive as Lloyd George suspected. This was shown when Haig proved remarkably compliant over the General Reserve concept, thus demonstrating that Lloyd George had by no means prized apart a significant alliance. Worse still for Lloyd George, Wilson was no more biddable a Chief of the Imperial General Staff than Robertson and quickly revealed that his supposed differences with Robertson were ones of detail and emphasis rather than core principles.
It was against this backdrop of mutual suspicion and misunderstanding that the War Cabinet attempted to liaise with the army over the vital issue of manpower. Unfortunately for Haig and the BEF, given the magnitude of the threat hanging over them, the suspicion Haig had created in London over his handling of the Passchendaele and Cambrai campaigns meant that Lloyd George had little sympathy for GHQ’s manpower demands. Desperate to limit Haig’s ambitions, to exploit the alleged advantages offered by other fronts and to maintain the British war effort on the home front, the distribution of manpower was a major problem for Lloyd George. Wanting a more ‘scientific’ management of Britain’s human resources, Lloyd George established a Manpower Committee to determine priorities in the winter of 1917. The conclusions reached were not particularly generous to the army, and the situation was exacerbated by the decision to withhold 120,000 men in Britain as a ‘general reserve’. Criticism can certainly be levelled at Lloyd George for his failure to appreciate German offensive capabilities, but the situation facing him was far from clear. Haig had been somewhat ambiguous in his assessments of actual German potential and intentions, which was partly the result of underestimations of troop transfers from the east. This seeming lack of concern was reflected in the decision to allow leave arrangements to continue unhindered, which meant that 88,000 men were in Britain when the German offensive commenced in March.Footnote 9 The confusion over manpower was therefore based on miscalculations, misunderstanding and suspicion on the part of both the government and GHQ. But there can be little doubt that the BEF was desperate for reinforcements, having suffered such high losses in 1917. On 1 January 1918, the BEF was 70,000 men short of establishment, but on that date there were 38,225 officers and 607,403 men trained and ready for service in Britain.Footnote 10
Lloyd George was unwilling to release these men, convinced as he was that they would be assigned to futile offensive operations. Lloyd George’s reluctance to hand over men was not merely a question of public confidence in his ministry if further bloody, and ultimately fruitless, offensives followed but also that of the British war economy. Maintaining the war effort required a very delicate balancing act of manpower resources, which was becoming increasingly problematic given the army’s insatiable appetite for men. In the event, over the course of the crucial period between 21 March and 31 August 1918, 544,000 men were despatched to the front from Britain.Footnote 11
Stabilising the BEF’s manpower situation was all the more pressing given the indicators of declining morale such as increased drunkenness, desertion and other forms of ill discipline. In order to convince Lloyd George of the scale of the manpower problem, the War Office produced a plethora of statistics. Unfortunately for the BEF, Lloyd George was highly dubious of all War Office calculations and forecasts by this stage, believing that they had been manipulated deliberately to suit Robertson. A further complication was the debate on German strength and intentions. Knowledge of the transfer of German divisions was widespread, and Haig discussed it with the War Cabinet on 7 January. It was noted that thirty-two divisions could be transferred at the probable rate of ten per month, making March a potentially dangerous time. The discussion then moved on to consider the likelihood of a German assault and whether the British or French Armies would be the main targets. Revealing a degree of insouciance about German intentions, Haig was guarded about supporting the French should they be attacked and expressed a desire to attack in Flanders. Robertson was most alarmed by Haig’s seeming lack of concern at the possibility of a major German offensive and persuaded him to add his signature to an appraisal written up after the meeting highlighting just such a scenario. This did little to create a positive impression on Lloyd George, who viewed this sudden about-face as typical of Haig’s woolly minded lack of focus. Haig then committed a further faux pas at a lunch with Lloyd George and Derby on 9 January, at which he expressed his confidence that Germany was down to its very last manpower reserves and that risking these scarce resources in a full assault would be a desperate gamble. He added that if the Germans did pursue an all-out offensive, the blow would most likely fall on the French. This again implied that he was fairly sanguine in his appreciation of German intentions, and this certainly did not seem like a desperate call for men.
Somewhat ironically, in this instance, Lloyd George was happy to accept GHQ’s scepticism on the possibility of a major German assault, for it allowed him to justify a lower priority for the Western Front. Understanding Lloyd George’s precise thinking is difficult given the stream of information coming his way, but he probably wanted to play a waiting game during 1918, in which American power was firmly established in France as the vital pre-requisite for offensive action in 1919 or even 1920. But, by focusing so intently on the longer game, Lloyd George and the War Cabinet omitted to concentrate sufficiently on the immediate term. This misreading nearly caused complete disaster when the German spring offensives commenced.
With the manpower issue at an impasse, the War Office was forced into desperate expedience. GHQ was ordered into a radical restructuring of the BEF. Brigades were reduced by one battalion each, and the number of divisions contracted from sixty-two British and Dominion in the autumn of 1917 to fifty-eight by mid-January 1918; the cavalry divisions were also reduced from five to three. The actual figures vary from source to source, but it would appear that 134 British infantry battalions were lost through disbandment, amalgamation or conversion, reducing the strength of the army by about 70,000 by January 1918 compared with its position a year earlier.Footnote 12 Rearrangement was, of course, a time-consuming and disruptive process compounded by the fact that the government forced Haig to extend the British line in response to French requests. Although Haig was aware of these long-standing and repeated demands, he had used the Third Ypres campaign, Cambrai and the assignment of troops to Italy as diversions to avoid taking on the responsibility. Haig was extremely concerned at this extension southwards to the region of Ailette-Soissons-Laon Road, believing that it stretched his resources by increasing the British front by 30 per cent from ninety-five to 123 miles. Holding an extended front with greatly reduced numbers was a severe strain made more intense by the need for extensive work on new defences. Training almost ground to a halt as men spent long, hard hours digging fresh trenches, laying wire and filling sandbags in bitterly cold weather. Unsurprisingly, this contributed to the dip in morale that was so carefully monitored by the War Cabinet.
Although the reorganised divisions concentrated fire power within the contracted brigade structures, this probably meant little to the men working hard on the new defences. Noting the defensive tactics of the Germans, the BEF adopted a similar system based on three interlocking zones: forward, battle and rear. The forward zone was a trip-wire of dispersed but mutually supporting posts designed to harass the enemy, alert other units and gradually crumple backwards into the ‘battle zone’. The battle zone was then to be the anvil on which attackers were hammered, for it was to be at least 2,000 to 3,000 yards deep on specially selected heavily wired ground. The defenders in the battle zone were to be supported by corps- and army-level counter-attacks to ensure local supremacy and the decisive halting of an assault. The rear zone, four to eight miles further back, was a final backstop line similar in structure to the forward zone.Footnote 13 According to the orders issued in XVIII Corps, divisions were to be responsible for preparing the forward zone, corps the battle zone and armies the rear zone.Footnote 14
This highly sensible and intelligent response was, unfortunately, fraught with flaws.Footnote 15 The over-arching concept behind the system was never fully understood by the BEF as a whole, once again revealing a disturbing inability to disseminate information clearly and thoroughly. Thus, although the system demanded that the forward zone be lightly held given its relative lack of importance, some divisions packed it with the majority of their men, leaving little for the main battle. In a continuation of the confusion of command, even as prescriptive a commander as Hubert Gough, when confronted by differences in the distribution of their formations between Maxse of XVIII Corps and Butler of III Corps, simply chose to instruct them to settle it among themselves.Footnote 16 A further block to widespread and uniform understanding of the concept was the difficulty of getting the BEF to reverse its tactical thinking in such a short space of time. Having spent almost the entire war considering ways of attacking positions, fewer front-line officers and men could immerse themselves in the mentality of the defence. This was in stark contrast to the Germans, who had been perfecting defensive systems for the best part of three years. There is no doubt that the dissemination of lessons learned was far superior in 1917–18 than in previous years, and the compilation of doctrinal training manuals was moving from a committee-based approach to a dedicated editorial team within GHQ’s Training Branch. SS210, The Division in Defence, however, was still not completed in March 1918 and only appeared in May, by which time it was too late, although there is some evidence that its conclusions were at least considered valuable.Footnote 17 In any case, there remained the long-term problem of commanders choosing if and when they took notice of such official publications.
The British were therefore not psychologically prepared for the form of defence they had chosen. Used to the idea of fighting in line, the concept of separated posts and redoubts was alien. Many men expressed dislike of the ‘bird cages’ implied by a non-linear defence based on strong points.Footnote 18 In addition, many raw recruits felt extremely isolated by this strategy once the fighting began, and they sometimes proved hard to hold together. Platoon commanders, usually separated from their company and battalion commanders, carried a tremendous burden of responsibility. Often misunderstanding the nature of the defensive scheme, they decided to stay put and fight it out to the death or surrender when the situation was hopeless rather than execute a methodical, fighting withdrawal. As Edmonds noted in the official history: ‘No warning seems to have been given to any brigade or battalion commanders, and therefore none to the lower ranks, that in certain circumstances there might be an ordered retreat.’Footnote 19 There was also a misunderstanding as to the likely nature of German offensive tactics. Assuming that they would mirror those used by the Germans in the Cambrai counter-attack and at Caporetto, it was believed that simply reproducing German defensive tactics as experienced at Third Ypres would be sufficient to stop German progress. Haig, indeed, was concerned primarily that the Germans would not attack.Footnote 20
The final problem was that faced by Fifth Army, which had extended its front in accordance with the Supreme War Council’s instructions. Dangerously overstretched, it had to complete new positions at immense speed due to a lack of preparations by the French. All these difficulties meant that by March 1918, the defensive preparations were patchy, particularly the rear zone, which often existed only on army maps with barely a trace on the ground. Third Army was somewhat better placed in terms of the completion of defences. Moreover, while Byng was holding twenty-eight miles with fourteen infantry divisions, Gough was holding forty-two miles with just twelve divisions.Footnote 21
GHQ was well aware that Fifth Army faced a particular problem, and concerns intensified when intelligence reports identified the presence of General Oskar von Hutier’s Eighteenth Army in the area. The British knew that Hutier was the mastermind behind the storming of Riga, and his sudden appearance in the west combined with other evidence of preparations put Fifth Army HQ and GHQ on the alert. Gough liaised with Davidson at GHQ, and both men identified the major problem of the devastated Somme battlefield, which lay to Fifth Army’s immediate rear. It acted as a massive block on the easy distribution of men and materials and would hinder all movement in a battle. As a result of these discussions, both men agreed that Fifth Army might have to make a substantial retreat if put under severe pressure. However, the sense of this decision-making was somewhat undermined by GHQ’s insistence on holding Peronne, which required yet more extensive work on defences. Gough was now swamped with orders to construct elaborate defensive positions over an extensive area with a small labour pool. The fact that no one at GHQ seemed capable of realising this does not reflect well on its decision-making processes.
Despite Gough’s serious doubts about the task in front of him, he clearly did not raise them directly with Haig when they met for dinner on 15 March. Understanding Gough’s motivations for remaining silent is difficult but may have been connected to an increasing sense of insecurity. His aptitude for command had been questioned widely in London during Third Ypres, and there had been calls for his removal. An additional reason for silence may also have come from Gough’s understanding of Haig’s overall appreciation of the situation, for he seems to have gained the impression that the real focus of the BEF was the Channel ports, so a defeat at the extreme south of the British line would not necessarily be catastrophic. Haig’s dispositions certainly support this interpretation. Of his four armies on the Western Front, Fifth Army had by far the longest front to cover and was the hardest to support with reserve divisions (GHQ had allocated two to each army). Given that the intelligence assessments available to Haig suggesting an assault on Third and Fifth Armies, the concentration on the BEF’s northern sector seems muddle-headed, albeit that ground could be more readily yielded there than in the north. A further complication was the commander of the extreme right hand of the BEF, Lieutenant-General Sir Richard Butler of III Corps. Butler took over this post on 25 February, having been a member of the GHQ staff. Placing a novice general in such an important position does not seem a particularly sensible decision. Once again, the role of GHQ appears an enigma. Rational, intelligent and useful decisions and assessments were undermined by contradictory actions.
Generally, GHQ had made a reasonable assessment of German strength, suggesting that the number of German divisions on the Western Front had risen from 147 in October 1917 to 187 by 21 March, when the actual figure was 191 divisions: in fact, most of the new divisions brought west were used to release those with Western Front experience from quiet sectors to spearhead the offensive. Cox, however, believed as late as 2 March that the main German effort would be against the French in Champagne. In that sense, GHQ Intelligence did not entirely fail, but it was less prescient than later claimed.Footnote 22
By 19 March, GHQ intelligence was convinced that an assault would be launched on 20 or 21 March, which triggered a warning order to all units. It was a good assessment, for the German assault, code named ‘Operation Michael’, commenced at 4:45 AM on 21 March with an initial bombardment of five hours’ duration followed by an infantry assault along a fifty-mile front straddling Third and Fifth Armies’ positions, much as predicted by British intelligence. Supported by an overwhelming firepower superiority of some 10,000 guns and heavy mortars firing 3.2 million rounds, German infantry from seventy-six divisions rapidly overcame the twenty-six divisions and 2,686 guns of Third and Fifth Armies. The importance of artillery to German plans reveals that the celebrated brilliance of German infantry was as reliant on artillery as their British foes. In most cases, British resistance wilted instantly, such was the shock and violence of the German assault against overstretched resources. The forward zone failed as a trip-wire, overrun as it was in quick time, which then put immediate pressure on the battle zone. It has been calculated that 84 per cent of the British infantry were within 3,000 yards of the front line, with at least a third of the Fifth Army being overwhelmed in ninety minutes: of eight battalions in XVIII Corps, for example, barely fifty men got back to the battle zone.Footnote 23
Moreover, to support infantry adequately against attacking infantry, artillery had to be no more than 2,000 yards from the front, which rendered it vulnerable. Many guns were lost, particularly heavy artillery that simply could not be pulled back quickly enough, while counter-battery work was entirely disrupted by the collapse of communications due to the weather conditions. Flash spotting and sound ranging also were impossible.Footnote 24 The amazing tempo of the assault is revealed in the fact that 21,000 prisoners were taken during the day: British troops had simply been given no opportunity to put up a meaningful defence. However, the magnitude of the German success should not be over-exaggerated. At no point had the Germans reached their final objectives. The battle zone had not been breached, albeit the extent of success made its retention problematic. In the northern sector, the progress was deemed disappointingly slow. Equally worrying was the scale of the casualties. Although the British experienced a disaster, losing some 500 guns and 38,512 men, the Germans suffered the usual experience of the attackers on the Western Front insofar as their 39,929 casualties exceeded those of the defenders.Footnote 25
This scenario thus had similarities with British experiences in 1916 and 1917 in which the opening day of battles provided great successes intermingled with elements of great concern. Unlike the British experiences of 1916 and 1917, the Germans did not find the subsequent days much harder as more troops and guns poured in to hold back the offensive. The difference lay in precisely the factors identified as disturbing before the battle. The lack of easy communications across the old Somme battlefield combined with an absence of strong defensive positions meant that the British did not have the ability to shore up the over-extended Fifth Army. During the course of 21 March, Gough frantically tried to exert control amid the wreckage of his command system, and although the Germans were less active on the following day, this still did not give Gough the time he needed to reorganise and bring order to his forces. He made no effort, however, to speak to Haig.Footnote 26 Left with little option, Gough had to devolve decision-making to his corps commanders, which led them, unsurprisingly in the circumstances, to advocate major retreats. Cohesion now collapsed completely as lateral communications broke down. Corps were therefore making unilateral decisions that often severely compromised the positions of their unwitting neighbours. Wishing to break contact and re-establish effective command, Gough ordered a retreat to the Peronne bridgehead position at 10:45 AM on 22 March, a decision confirmed by Haig at 2000 hours. Gough left decisions on withdrawal to the discretion of his subordinates. In any case, as the bridgehead position had never been given the attention it required, it was little more than a mark on the map.Footnote 27
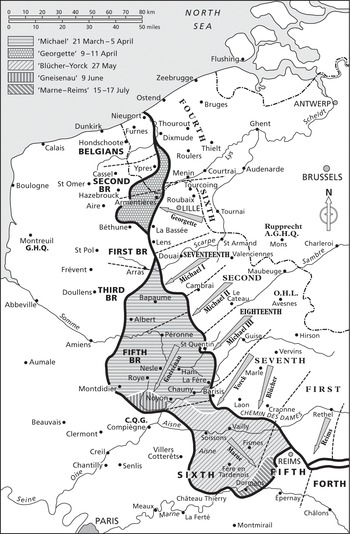
Map 12 German offensives, March–July 1918
At just this moment a crisis on Third Army front began to emerge. Third Army had generally fought well and had restricted the Germans to modest advances. But Byng had emphasised a vigorous forward defence and thus had little in reserve to meet further emergencies. The problem came when German advances threatened to cut off completely his three divisions in the Flesquières salient close to the hinge with Fifth Army. When the Germans began to make progress against the salient’s right flank, Third Army was forced to retreat northwest away from Fifth Army, thus threatening to open an irreparable breach between the two forces. The retreat of the two armies then left open the dangerous possibility that Amiens might fall and with it a major railway junction threatening the BEF’s communications network. Amiens was vital in that it handled half the supplies coming from the main British supply ports of Rouen, Le Havre and Dieppe, as well as 80 per cent of all north-south traffic. Fortunately, the Germans did not initially make Amiens an objective.Footnote 28
By this point, Pétain, Commander of French forces since Nivelle’s ignominious collapse, was growing concerned. He was trying to assist the British in stabilising their right but was also convinced that a German assault was imminent against his own troops in the Champagne region. This ran contrary to Haig’s assumption that the German aim was to sever the link between the British and French Armies. Haig was desperate to keep Pétain’s attention on the actual crisis rather than a potential one and was worried that the French would not realise the full gravity of the situation before it was too late. News of the situation in France had reached London, where there was mounting concern. Lloyd George despatched Lord Milner to act as his personal emissary to assess the situation. The precise course of subsequent events is disputed in competing versions, and it appears that Haig subsequently wanted to give the impression that he had at no point lost control of the situation. What cannot be disputed is Haig’s fixation on the need for maximum French assistance, a point he made to Sir Henry Wilson on the morning of 25 March when both men agreed to request a Franco-British conference to discuss the matter. Believing that Pétain might need to be overruled, Haig was very keen on high-level French political involvement. This desire was achieved, for on the following day a French team of Poincaré, Clemenceau, Foch and Pétain met Haig, Wilson and Milner at Doullens’ town hall. Agreement was achieved on two crucial points. Firstly, Amiens had to be held, and secondly, Foch should be appointed as co-ordinating general to oversee operations. Although Foch’s actual powers were left sketchy by the conference, he acted immediately by deploying the only card he had available at the time – the force of his own personality. He therefore visited Fifth Army HQ demanding more vigorous action, which no doubt seemed a fine gesture in his own mind but was merely annoying to an already hard-pressed Fifth Army staff. His next move was more positive as he issued orders directing more French troops to the assistance of the British.Footnote 29
Haig seems to have been perfectly happy with this outcome. A major crisis on the BEF front was now regarded as an entente problem requiring a significant level of co-operation. The decision also came at the very moment that Operation Michael began to run out of steam. German troops had worn themselves out traversing the Somme battlefield and found that their logistical systems were collapsing under the strain of supplying men on the far side of a devastated region. British and French reinforcements were also pouring in, bringing stability to the entente line even if the situation remained grave. Ludendorff maintained Operation Michael until 5 April, but each assault revealed that it was rapidly dwindling in offensive power. Fifth Army held on very badly battered but never completely routed and driven from the field entirely. Although Fifth Army had suffered high casualties, the Germans lost somewhere in the region of 230,000 men, who could not be replaced and had not achieved a decisive breakthrough.Footnote 30
Somewhat ironically, just at the moment when the entente situation was improving, Gough found himself a casualty. On 28 March he was dismissed from command of Fifth Army and replaced with Rawlinson. Having aroused severe doubts by his conduct of earlier battles, Gough was fatally weakened by the disaster that befell Fifth Army, even if on this occasion he was by no means solely culpable and had done his best in extremely difficult circumstances. Haig certainly did little to protect Gough but did sweeten the pill by offering command of a newly constituted Reserve Army. Lloyd George was not prepared to countenance this and demanded that Gough be removed altogether. There was a need for a scapegoat, and Gough’s already damaged reputation undermined his position. In the midst of this wrangling, Ludendorff launched a fresh offensive against First and Third Armies. ‘Operation Mars’ commenced on 28 March at 7:30 AM with a bombardment followed by nine assault divisions and was supported with fresh attacks against Fifth Army further south. Accurately predicted this time by British intelligence, the attack was largely unsuccessful as most German units did not employ the new storm-trooper tactics. This decision allowed the British to capitalise on their strengths, and the advance was brought to a halt by resolute troops in good defensive positions.Footnote 31 Haig offered his own resignation to Derby on 6 April but knew it was unlikely to be accepted, although it was actually taken more seriously than he imagined: as in January, there was no obvious successor.Footnote 32
Despite the check of this new German assault, Haig remained anxious and was as keen as ever to maintain a solid Anglo-French barrier. A major boost to entente unity came on 3 April when a high-level conference was held at Beauvais attended by Lloyd George and Clemenceau as well as Pershing, Haig, Foch and Pétain. It was agreed that Foch would take charge of strategic direction while still leaving the national army commanders free to appeal to their governments. Haig expressed his feeling that a French offensive was the best response to the situation as it would disrupt German plans considerably. After initial agreement, the French did little to prosecute this idea, and the British floated alternative suggestions. The first was a request that the French consider taking over line from the British, and the second was the massing of French reserves in the Vimy area. The re-positioning of a French reserve was a response to intelligence reports which suggested a further assault on the British somewhere in the Arras-Cambrai area.
In fact, the British had got their interpretations slightly wrong. The target for the next German offensive was the Lys Valley, which opened the possibility of a drive to the Channel ports and a subsequent unhinging of the British line. Believing the boggy ground of the Lys would make it unattractive, British planners had not given it a high priority. It was therefore not held in any particular strength and contained two low-quality Portuguese divisions among the defending troops. ‘Operation Georgette’ was launched on 9 April and quickly overran the Portuguese positions. There was still an assumption initially that it was only a diversion.Footnote 33 Soon, however, realising the gravity of the situation, Haig was concerned that his troops would be cut off in Armentières and stressed the need for French assistance once again. Unable to hold Armentières, Haig ordered it evacuated, but this opened the way to the important railway junction of Hazebrouck and threatened to expose the entire British left flank to defeat in detail. So agitated was Haig that he issued his melodramatic ‘backs to the wall’ message on 11 April. At Ypres, Plumer prepared to evacuate the Passchendaele salient and make a stand on the Pilckem Ridge. The sense of panic that seemed to be in the air was perceived by many French generals as a sign of weakness in their British counterparts that did little to bolster French confidence in their ally. Fortunately for the British, the Germans were once again losing momentum and, unable to take the high ground around Kemmel, could not evict the British from the Ypres salient entirely.
But there was little time to draw breath, for on the 24 April there were fresh attacks on the Amiens sector. Byng suggested that Cox had ‘lost the German Army’.Footnote 34 The situation looked grim when Villers-Bretonneux fell, but a counter-attack by Australian and British troops in the early hours of the following morning stabilised the situation. The high-water mark of the German offensives against the British had been reached. Although British troops had been hard pressed and were intensely weary, nowhere had they been routed entirely and nowhere had a major gap opened up for any length of time. The British found good use for their cavalry as mobile fire power forces, which ensured that such gaps in the line were kept to a minimum. The defence had been led by a mix of veterans and inexperienced conscripts who had held together in the face of intense pressure. In all the engagements, the British were given a glimmer of hope, for by no means was every German assault made in the textbook storm-troop manner so admired by the advocates of the German Army. Instead, many had been delivered en masse with little tactical sophistication and consequently fell victim to British fire. Where successes were achieved, the Germans found their lack of mobility crippling. Unable to ensure a regular flow of men and materiel across the devastated regions and stripped of effective cavalry, the Germans could not maintain momentum, allowing the British the time to recover.
By contrast, and despite the immense strain put on them, the British maintained mobility and logistical flexibility. The depth of the BEF’s logistical infrastructure is revealed in the fact that it had the resources to fire off 5.5 million eighteen-pounder shells and nearly 1.5 million howitzer shells during Operation Michael. In terms of eighteen-pounder ammunition, this represented almost the entire stock available in the spring of 1916 for the Somme battle. In all, 859 guns were lost in three weeks, but the losses could be made good. In addition, throughout the German offensives, the BEF kept up supplies from the Channel ports to the artillery, and only 9.2-inch howitzer shells ever fell short of requirements. Over 555,000 tons of supplies were still in hand in November 1918.Footnote 35 Aware that he had reached deadlock in the north, Ludendorff suddenly switched his focus much further south. ‘Operation Blűcher’ was pitched against the French in Champagne on 27 May. Tragically for the British, the assault partially fell on units of IX Corps, which had been sent south to recuperate after their mauling further north. Filled with fresh conscripts and tired veterans, the divisions crumbled after an intensive German bombardment. Foch was rather confused by the attack, as it seemed to offer little hope of great success unless Soissons could be captured, which the Germans signally failed to do. A further heavy assault was delivered on 15 July but once again failed to achieve the decisive victory despite giving the French and Americans in the sector a severe shock. With the situation so fluid, Foch was anxious to gain more power, believing that his overview gave him a significant advantage which could be exploited only if he had the right to deploy and command troops more extensively. Haig was not particularly happy with this idea, but Lord Milner overruled him and provided the agreement of the British government on 7 June. This move towards still further cohesion of entente effort was a positive one and, combined with a number of other factors, added up to a decisive shift in advantage to the entente side. By the early summer of 1918, American divisions were finally in place, having been equipped and trained in trench routines. Secondly, the dreadful impact of Spanish influenza started to make itself felt. Worn down by years of short rations due to the effects of blockade, German troops were more susceptible to it than those of the entente. Already short of men following their offensive efforts, the Germans now saw disease adding to the attrition. Indeed, the British deliberately aimed their later operations on the Hamel and Amiens fronts knowing the Germans in this area had been badly affected by the influenza outbreak.Footnote 36
The moment for counter-offensive was approaching. Both Foch and Haig were planning assaults by late June, and on 4 July, the Australian Corps under Lieutenant-General Sir John Monash attacked in a manner that revealed the enormous potential of experienced commanders and soldiers supported by abundant munitions of all types. The battle of Hamel was a small masterpiece of meticulous planning, the integration of a number of arms and confident battlefield performance by the troops on the ground. The village of Hamel and 1,000 prisoners were taken with minimal loss.Footnote 37 A fortnight later the French and Americans took up the offensive, launching assaults in Champagne.
Much trumpeted as heralding a new dawn for the BEF on the Western Front, Hamel can instead by read as a further evolution of the set-piece battle skills revealed so regularly in 1917. Perhaps the biggest novelty was the perception of those involved in authorising and planning the operation, for no one saw it as anything other than a minor affair that was not to get out of hand even if successful. It is this breakthrough in operational thinking, rather than the technicalities of the execution, which made Hamel a novelty. Content with the successes of the day, no one in the BEF insisted that the operation be maintained in the expectation and hope that a few days of improvised assaults would unhinge the whole German position. Hamel was therefore very different to Arras, Third Ypres or Cambrai. The action also revealed the strategic difficulties of the Germans. They had greatly increased the amount of territory under their control, but it overstretched their available manpower considerably. In addition, the hungry and tired German soldiers were now stuck in makeshift defences a long way from their well-prepared original positions from which they could operate with such confidence and skill. The strain was such that Ludendorff was forced to abandon plans for an offensive in Flanders, codenamed ‘Operation Hagen’, in order to deploy the troops and materiel elsewhere.
Looking for an opportunity to strike back, Haig was sympathetic to Rawlinson’s suggestion that Fourth Army prepare for a major offensive, (As noted, Rawlinson had replaced Gough at Fifth Army on 28 March, and the force was then redesignated Fourth Army on 2 April.)Footnote 38 Rawlinson planned to assault just east of Amiens between the Somme and Luce Rivers and make a seven-mile advance to ensure the safety of the city. Anxious to hit as hard as possible, Rawlinson requested the Canadian Corps to supplement the Australian and III Corps and French co-operation south of the Luce. Haig agreed to both requests and approached the French for help. The eventual result was a plan to strike hard without a preliminary bombardment in order to maximise surprise, with the infantry advancing under the cover of a creeping barrage assisted by tanks and aircraft. Foch was keen to provide maximum assistance and ordered Debeney’s First Army to stage an equally grand supporting assault. Speed was now of the essence for Rawlinson as he was anxious to strike quickly lest the Germans withdraw before the punch was delivered. Accepting this possibility, Haig ordered Rawlinson to be ready for action by 8 August and at the same time requested that the attack aim for the Chaulnes-Roye line some twelve miles from the starting position and plan for exploitation towards Ham three miles further. Such interventions and scaling-up of objectives had been disastrous in 1916, but they were less dangerous than two years previously. The main reason was the overwhelming fire power the British were able to gather, which was then concentrated onto much weaker defences and delivered with the additional advantage of complete surprise. Fourth Army’s guns were doubled to 1,000, and nearly 2,000 British and French aircraft were allocated to assist the assault, as well as 534 tanks.Footnote 39 The insistence on surprise meant that everything was assembled using great care, and the need for utter secrecy was stressed to all. Unusually, there was a deception plan, the Canadians leaving some formations in place while the bulk of the Corps was transferred from Arras to Amiens in just ten days in complete secrecy. Random silences on radio and field telephone networks and manipulation of signals traffic at army and corps levels added to the misleading effect.Footnote 40 The Germans threatened to spoil these meticulous preparations on 6 August when the newly arrived Württemberg Division commenced an assault on III Corps. Although disruptive, the attack by no means altered the wider situation, and Rawlinson remained on schedule.
The offensive opened at 4:20 AM on 8 August with the infantry attacking at 4:24 AM ably assisted by a well-planned creeping barrage, tanks and a highly effective counter-battery programme: some 95 per cent of all German batteries had been previously identified.Footnote 41 South of the Somme, the Australians and Canadians smashed their way forward, allowing cavalry and armoured cars to move through them and harass the rapidly retreating Germans. Both Dominion forces were by now highly efficient organisations often deploying British staff officers in a well-integrated team which maintained consistency of approach, unlike British units, which were rotated regularly between corps. The Canadians in particular, backed up by fresh drafts after passing a conscription act, were kept up to strength and had become the cutting edge of the British imperial armies. North of the Somme, III Corps met stronger resistance; as a result, its attack was less impressive, which was unsurprising given the punishment it had received a few days earlier. The Royal Air Force (RAF. Formed as an independent force on 1 April 1918.) also had a jarring day, suffering heavy losses while trying the difficult task of low-level bombing of bridges, for which it was simply not equipped.Footnote 42 As had happened so often in 1916 and 1917, the following days were ones of rapidly diminishing returns. German resistance became better organised and more difficult to dislodge. Unlike previous battles, Haig revealed a clear grip and accepted Rawlinson’s decision to close the battle down on 11 August. This sensible decision ensured that the victory remained a victory: Fourth Army and French First Army had taken just short of 30,000 prisoners and 400 guns. In return, Fourth Army had suffered about 20,000 casualties, but the overwhelming majority were wounded rather than killed.Footnote 43
At this point the BEF revealed another significant advantage. Thanks to the productivity of its home front industries combined with the sophistication of its logistical infrastructure in France and Belgium, it now had the ability to switch to another sector. A year earlier the British had been unable to follow up their success at Messines with an immediate assault on the Pilckem Ridge. Now the situation was transformed. Revealing an embarrassment of materiel riches, Haig was able to consider a fresh assault delivered by his Third and Fourth Armies in conjunction with French First Army supported by 200 tanks. Although the British now had the ability to maintain an offensive in a flexible manner, it was not quite able to meet Haig’s tempo, and it was not until 21 August that Byng was ready to commence. Once again, Haig revealed that he had learned much, for Byng was not put under undue pressure to hurry. When the assault commenced at 4:55 AM on 21 August, Byng’s men moved forward and took 2,000 prisoners for minor losses, but the day was by no means easy, with severe resistance encountered at Achiet le Grand. Anxious to keep up the pressure, Haig urged Byng forward much to the Third Army Commander’s distaste. Any intention to maintain the offensive was then undermined by a German counter-attack in the area. Repulsed with relative ease, its failure unbalanced the Germans and opened the way for a further advance on 23 August, with the result that by the following day over 10,000 prisoners had been taken. It was at this point that the BEF’s ability to dance around the ring like a good boxer and deliver blows at will was fully revealed, for on 26 August, Horne’s First Army went over to the offensive, attacking successfully either side of the Scarpe. Haig had told army commanders on 23 August that they could take risks even if flanks were exposed and could allow discretion to subordinates in reaching distant objectives.Footnote 44
By early September, First, Third and Fourth Armies were closing up on the Hindenburg Line. In the north, First Army prepared to break the Drocourt-Quéant Line, the formidable defensive position that had proved so stubborn in the Arras fighting of 1917. In a well-planned operation, the line was taken on 2 September, while in the south Monash pushed his forces through the Peronne–Mont St. Quentin sector. With these victories the BEF was brought another step closer to the edge of the main Hindenburg positions, having taken over 72,000 prisoners since August as well as nearly 800 guns. The next step was taken on 12 September, when Byng took the Havrincourt Spur. It was now up to Rawlinson to complete the task with Fourth Army. On the same day that Byng’s IV and V Corps successfully brought Third Army to within sight of Cambrai, Rawlinson held a conference of his corps commanders. He put forward his plan to advance across a 20,000-yard front which would capture the old British front lines and bring his forces to the outposts of the Hindenburg Line from Epéhy in the north to Selency in the south. Fourth Army had a comfortable firepower and manpower supremacy over the German defenders, but the weather was poor, which affected observation.Footnote 45
As with many of the assaults since 8 August, it was decided to dispense with a preliminary bombardment in favour of a creeping barrage heavily intermixed with smoke. When the assault commenced in mist and drizzle at 5:20 AM on 18 September, the central (Australian) corps advanced well, but the flanking corps were less successful. In the north, III Corps had to deal with a series of heavily defended fortress-villages, and in the south, IX Corps faced the equally formidable Quadrilateral Redoubt. The failure to take all these positions in one day revealed that despite fading German morale, it remained extremely difficult for infantry, no matter how skilled, to take strong defensive positions without a heavy, accurate bombardment. Despite these setbacks, the battle was still a success, with 9,000 Germans taken prisoner and the Hindenburg Line within reach.Footnote 46
Haig, with Foch’s agreement, now planned to bring all the BEF’s armies into action while French and American forces launched separate, but interlocking, offensives. In effect, the British, French and Americans were now doing on the Western Front what entente strategy had demanded since the Chantilly conference of December 1915: close collaboration so as to deliver a continual rain of blows on the enemy. The new atmosphere of entente unity was such that Haig was prepared to allow Second Army to move from his command to that of the King of the Belgians in a Flanders Army Group. Facing the fifty-two infantry divisions (including two American) of Haig’s five armies were sixty-three German divisions. This numerical disadvantage was more than balanced out by the extremely parlous manpower condition of most German divisions. However, the Germans had now returned to the Hindenburg Line, which had been constructed so carefully and formed part of a defensive scheme German soldiers understood so well.
On 25 September, the French and Americans attacked in Champagne. They made solid advances but could not press on largely due to inefficient staff work in the American Expeditionary Force (AEF), which led to severe logistical difficulties. On the BEF’s front, action recommenced two days later when the Canadian Corps smashed its way across the Canal du Nord in a brilliant set-piece assault providing the central spearhead of the joint First-Third Army operation, which involved the co-ordination of infantry, artillery, engineers, machine guns, tanks and use of smoke and gas and ground-attack aircraft.Footnote 47 A day later, Second Army played its part in an impressive Flanders group assault, taking over 2,000 prisoners.Footnote 48
While these assaults were going on, Rawlinson’s Fourth Army was improving on the positions gained on 18 September. A well-planned attack by IX Corps on 24 September saw the Hindenburg Line outposts collapse and opened the way for a major assault on the main Hindenburg positions in the area, which appeared formidable in this area. Constructed at great expense during the winter of 1916, it utilised the St. Quentin Canal, which was 35 feet wide and contained six feet of mud and water. Much of it flowed in a deep, sheer-walled cutting fifty feet deep. This impressive obstacle was fronted on its western bank with thick belts of barbed wire, deep trenches and concrete machine gun emplacements. These defences were supplemented on the eastern side, where a series of heavily wired trenches had been constructed. On the northern half of Fourth Army front, the canal entered a 6,000-yard tunnel which was defended by a very strong forward line of multiple trenches and wire entanglements as well as three fortified villages, Bellenglise, Bellicourt and Bony. The one major weakness was the canal’s valley bottom position. If an attacker gained the high ground to its front, then its defences could be exposed to accurate artillery fire. Fortunately for the British, a complete set of plans was found in a captured headquarters, and this gave Fourth Army staff the opportunity to exploit the few weaknesses in the position.
Revealing the degree of respect invested in the Australian Corps, Rawlinson asked Monash to draw up a plan despite the fact that only a portion of it was going to be committed to the battle. Monash believed that the tunnel sector was most vulnerable and wanted the American divisions to make the initial advance before two Australian divisions leapfrogged through. Given the inexperience of the American troops and the depth of the defences in this sector, presenting them with such a hard task is a little difficult to understand. Nonetheless, Rawlinson accepted the plan, but made the Australian advance to the final position contingent on success along the length of the line. The other alteration Rawlinson made was to insert a plan from Lieutenant-General Sir Walter Braithwaite, who argued that a division from his IX Corps should assault across the southern (open) portion of the canal, which would give Fourth Army more elbow room and a firmer flank on the eastern bank. Monash was highly sceptical about this idea, but Rawlinson insisted, revealing a much firmer grip on the planning than he had done during the Somme battle of 1916. This greater resolve was revealed again a few days later when he took the decision to relieve Butler (III Corps) due to increasing doubts over his competence. Haig accepted the advice and took the further step of relieving the entire corps and replacing it with Morland’s XIII Corps.
Given the nature of the German defences, the attacking infantry had to be given every advantage. For this reason, 181 tanks were gathered, many of them with trench-crossing cribs. Cavalry and armoured cars were also brought up and detailed to work in collaboration with the ultimate objective of Valenciennes. The final element was a strong RAF deployment of over 300 aircraft.
Before the operation could commence, the US divisions needed to gain a better start line, but their assaults on 26–27 September did not go well. Some American troops managed to penetrate the German positions, but nowhere were objectives taken and held. This had an unfortunate repercussion on Fourth Army’s fire plan as American commanders were convinced that large numbers of their troops remained trapped in the German trenches. In turn, this made them reluctant to put down a creeping barrage for fear of hitting their own men. Rawlinson was fully aware that such a decision might imperil the success of the American units due to attack on 29 September, but he was equally well aware of understandable American sensitivity on the issue and so allowed the initial bombardment line to be shifted eastwards by 1,000 yards.
Revealing the need to treat well-prepared positions thoroughly, a preliminary artillery bombardment commenced on 26 September. The bombardment used 1,044 field guns and howitzers and 593 heavy guns and fired shells totalling 27.5 million pounds in weight. By contrast, the assault on 8 August had only used 12.7 million pounds, thus revealing once again the excellent work of BEF’s logistics arm.Footnote 49 The bombardment would deliver 126 shells per 500 yards of German trench every minute for eight hours. In all, 945,052 rounds would be fired.Footnote 50 However, the system was straining, and there were some delays in ammunition delivery. Moreover, there were still not enough guns to destroy all defences, and priority was given to counter-battery work, interdiction of rear areas, targeting of key points and cutting only gaps in the wire, the 106 Fuse being especially effective in detonating shells directly on the target.Footnote 51 The well-established tactic of intermingling gas and conventional shells to maximise confusion was used and heightened by the first British use of mustard gas shells, which were used exclusively against German artillery positions. Despite the great advances in British gunnery, the bombardment did not go entirely to plan due to poor weather hampering observation and the speed of ammunition supply. Labouring against these difficulties, the gunners could not quite deliver a perfect bombardment. In some sectors only a few lanes were cut in the wire, while the trenches opposite the 27th (US) Division were very patchily treated due to reasons mentioned earlier. On 46th Division’s front, which was covered by fifty-four eighteen-pounders firing two rounds a minute and eighteen 4.5-inch howitzers firing one round per minute, the guns managed to batter down the sides of the canal in some places, thus forming convenient slopping ramps for the infantry.Footnote 52
The full assault commenced at 5:50 AM on 29 September. Given the nature of the obstacle in front of it, the performance of Fourth Army must be hailed as one of the greatest feats of British military history. Clad in 3,000 lifebelts taken from Channel steamers and carrying portable boats and assault ladders, as well as heaving lines, the 46th Division bounced across the canal, scrambled up the other side, leapfrogged two brigades through and then consolidated its positions. To its immediate north, the 30th (US) Division took Bellicourt behind a highly effective creeping barrage and pressed on. However, it did not consolidate all its gains, which meant that the following 5th Australian Division had to fight hard in mopping-up operations, destroying its tempo. These successes in the central-south section were not matched in the central-north sector, for the 27th (US) Division made little progress on its front, which meant that its supporting 3rd Australian Division had to fight for the initial objectives rather than perform its assigned role of exploitation. By the end of the day, some progress had been made, but at heavy casualties for not particularly advantageous positions. On the northern flank, III Corps had an equally frustrating day as it battered towards Vendhuille, making a modest advance. The inability to wrench open the entire position then meant that the exploitation arms of cavalry and armoured cars could not be unleashed. These elements of relative failure disappointed Rawlinson, who does not appear to have realised the amazing victory achieved by his troops. Given Rawlinson’s often limited expectations, the fact that he believed more could have been achieved reveals his increasingly bullish nature. Less creditable was his irritation at the 27th Division, which he criticised for its lack of internal organisation.Footnote 53 Although there was some truth in this accusation, the magnitude of the task set before an inexperienced unit was the actual underlying problem.
The crossing of the St. Quentin Canal was, nonetheless, a great victory, which brought Fourth Army through the main Hindenburg positions on a 10,000-yard front to a depth of 6,000 yards, taking 5,300 prisoners.Footnote 54 Having lost this excellent defensive position, the Germans had few well-prepared defence lines on which to fall back, and the victory added to the speed with which German forces were crumbling. Thus, the entente assaults on 28 September led by the BEF had inflicted another major defeat on the Germans. The impact of the disaster, combined with Bulgaria’s decision to seek an armistice, caused Ludendorff to have some sort of mental breakdown that afternoon. Forced to survey an increasingly bleak scene, he came to the conclusion that Germany had to seek an armistice as quickly as possible, and he requested that a new government be formed to pursue this objective. Although Germany now had one aim, the ability to shape it was complicated by protracted discussions between the army high command and politicians over the precise nature of the peace feelers and who was empowered to make them. It was made yet more intricate by the fact that there was no attempt to engage with the allies as a bloc; rather, all communications were directed to Wilson, who did nothing to encourage wider discussion, taking it upon himself to act as sole negotiator while hostilities continued in Europe.
Anxious to retain some semblance of controlling destiny, the Kaiser appointed the moderate Prince Max of Baden to the post of Chancellor with instructions to begin armistice negotiations with Woodrow Wilson. Such measures reveal the increasing sense of desperation in Germany, but they came at a moment when the entente effort was beginning to slow down. The Americans were utterly unable to overcome their logistical mess in the Argonne. Heavy rain had stalled the advance on the Flanders front, and the Canadians met rapidly stiffening resistance after bouncing the Canal du Nord so brilliantly, while Third Army was battering its way across the Schelde Canal in a steady rather than spectacular manner.
This left Fourth Army as the only instrument capable of sustaining Foch’s desire to maintain pressure on the enemy. Over the next few days, Fourth Army managed to continue the offensive over its rambling front, sometimes only just, but its staff work and cohesion held together sufficiently for its subordinate units to fight their way through the Beaurevoir Line. At no point was the fighting easy, for the Germans were well aware that this was their last formal position in the region. Interrogation of prisoners revealed that they had been told to hold the position at all costs. By 5 October, Fourth Army was on the far side of the Beaurevoir Line and had the vision all had dreamt of since the descent of trench warfare four years earlier, open country. With the Germans retreating from the Armentières salient in the north, Haig could afford to feel satisfied. But his gratification was tempered by the increasing sensation that the bulk of the fighting was falling to the BEF, with the French and Americans failing to carry their fair share. This complaint appears to have been accepted by Foch, who promised to bolster French First Army to make it a more effective player on the BEF’s extreme right flank.
Despite this sour note, Haig was determined to maintain the initiative and urged planning for a further round of broad front assaults. Efforts were concentrated on the region south of Cambrai involving a combined attack by Third and Fourth Armies supported by the French First Army. It proved a very tricky task, for Third Army had not advanced through the Beaurevoir Line, so the assaults required careful integration to ensure that they achieved full mutual support. In yet another tribute to British staff work and artillery professionalism, an excellent barrage covered the advancing infantry, and a thorough counter-battery programme silenced German guns. The result was a heavy defeat for the Germans on 8 October in which 8,000 prisoners were taken and three armies thrown into full retreat.Footnote 55
Forced to evacuate Cambrai, the retreating Germans were harried all the way back to the River Selle by cavalry, tanks and RAF patrols. Anxious to provide an anchoring point for their disintegrating armies, the German high command then ordered all units in the region to go firm on the so-called Hermann Position I, a line of scratch trenches east of the Selle.
On 14 October, the Flanders Army Group went back on the offensive. Second Army played its part in ensuring a German retreat to the Lys. Units of Second Army then began to cross the Lys in strength on 18 October. By this point German command decisions were lacking relevance as they were often made redundant by the power and tempo of entente assaults. This was revealed when Ludendorff ordered the Northern Army Group to retire to the Hermann Position on 16 October, but a day later Fourth Army crossed the Selle and unhinged the position. For Rawlinson, the crossing of the Selle and suppression of its defensive lines were not an easy proposition despite the fact that it was nowhere near as strong nor deep as the earlier Hindenburg positions. He expected the Germans to put up a tough fight, knowing that blunting the spearhead of the entente armies represented the best way to gain favourable armistice terms. He was therefore determined to get his troops over the Selle efficiently, and this demanded a large artillery programme, which then slowed the operational tempo as his logistical train got to work. On 15 October, the preliminary bombardment opened. Despite throwing vast numbers of shells at the Germans, the bombardment was of patchy quality. Bad weather hampered reconnaissance, and so much of the firing was done on intelligent guesswork. It resulted in a battle that demanded all the infantryman’s skills. Battalions fought their way forward on the murky morning of 17 October with their own weapons and under officers making a plethora of important battlefield decisions in an immensely fluid day’s fighting which ended with Fourth Army making solid gains and breaking into the main German positions. Over the next few days, Rawlinson maintained the offensive until, in conjunction with French First Army, he had driven the Germans back to the Sambre and Oise Canals.
The fighting resulted in the capture of a further 5,139 prisoners but had nowhere been a walkover.Footnote 56 The intensity of these engagements seems to have burst the bubble of Haig’s optimism. From late September, Haig had been increasing in confidence but had been subjected to much less enthusiastic advice from Herbert Lawrence. Like Haig, Lawrence was convinced that the BEF was carrying a disproportionate share of the fighting, but unlike Haig, he saw it as a highly dangerous situation rather than a hindrance to efficient operations. Lawrence was concerned by the prospect of an overstretched BEF becoming vulnerable to counter-attack and left unassisted by allegedly timid allies. Haig seems to have perceived the hard fighting of 17 October in this perspective, which caused him to recommend lenient armistice terms to the government. Although he was confident that the BEF could maintain its immediate advance, he doubted whether the German Army could be defeated completely before it reached its own frontier. In raising this point, he stressed that the Germans might well be capable of dragging the war out well into 1919 and possibly 1920. Such a change of mood can be attributed to self-knowledge on Haig’s part: aware that he had often caused tension by his over-optimistic claims, it is possible to argue that this dampening of expectations revealed a more reflective attitude made by a mind which had matured as a result of previous experiences. However, the speed of the about-turn implies an inability to read the situation with sufficient insight and thus reveals a weakness in Haig’s approach to generalship. Once again, Haig seems to have been blinkered and lacked true vision; his judgement was made by too close a reference to the situation on the front of one of his armies and without enough consideration of the broader scenario. It seems to confirm the neat conclusion of Shelford Bidwell and Dominick Graham on Haig’s command style:
Haig’s vision of a battlefield was rather like that of a fan in the stands of Murrayfield, where his native Scotland played England at Rugby football; or perhaps that of a man looking at the ground between the ears of a horse. His conception of the scale of it was too small, perhaps, and he expected to see too much.Footnote 57
At precisely the same time, Haig’s opposite was revealing an even more dangerous lack of understanding. The pressure of the continuing entente advance was pushing Ludendorff to the limits of his mental endurance. In a fit of fatalism, he advocated a levée en masse and a fight to the last man. Such instability shocked even the Kaiser and led to his replacement on 26 October.
Regardless of Haig’s concerns, the BEF was still pressing forward. Second Army made gains in Flanders, while Fifth and First Armies were pushing towards Valenciennes. The next step was to get Third Army across the Selle in force in order to close up to Fourth Army’s forward positions. Byng planned his assault thoroughly, and when his forces advanced at 2:00 AM on 20 October, they achieved another stunning victory for the BEF. Over the next few days, the twenty-three British divisions and the one New Zealand division supported by two US divisions smashed their way forward taking 20,000 prisoners and 475 guns.Footnote 58 The next objective was Valenciennes, the last significant city before the Belgian border. First Army began its preparations, deploying Currie’s formidable Canadian Corps to the centre. Taking Valenciennes was no simple matter. The southern approaches to the city were covered by two parallel streams, the Ecaillon and the Rhonelle. The Ecaillon was a stiff proposition, for it was fast flowing, had steep banks and was well wired. Despite these difficulties, when the 51st and 4th Divisions attacked in the early hours of 24 October, they were able to scrabble across and were close to the Rhonelle by the end of the day. Horne, commanding First Army, was now in an excellent position to attack Valenciennes from the south, but this meant dealing with the dominant feature of Mount Houy first. In discussion with Currie and Godley, Horne opted for a closely controlled assault unfolding in three phases. The first was the capture of Mount Houy, which would then set up an attack by the Canadian Corps to the outskirts of Valenciennes before ending in a combined assault by the Canadian and XXII Corps.
Preparations were made in the face of considerable German activity. Forceful counter-attacks had to be beaten off on 27 October, which revealed that the Germans in the vicinity were not yet utterly defeated. It was a foretaste of the intense fighting that took place on the following day when First Army’s initial assault commenced. Mount Houy was contested with great vigour, and by the end of the day, 51st Division held only the lower slopes. This failure upset the timing of the next phase and also meant that the Canadians would have to include the mount in their plans. Deploying the deliberate method it had refined with such skill, the Canadian Corps planned to advance under a sophisticated and heavy bombardment. Supported by a flexible logistics system capable of delivering munitions in abundance, the Canadian Corps fired 2,419 tons of shells between 31 October and 2 November as they saturated German positions and pushed the infantry through in another brilliant feat of arms. In effect, the Canadians had the support of one gun for every six men on a front of 2,500 yards.Footnote 59 The advance made the German grip on Valenciennes untenable, and they began evacuating the city on 2 November. First Army gradually realised that it was now involved in pursuit operations, but it was difficult to move forward with great speed due to the rolling, wooded country.
Third and Fourth Armies were also due to resume the advance and, like First Army, found that a new set of tactical problems was opening up. Instead of trench lines, the planning staff in both armies had to take careful note of the number of small villages, towns and geographical features in front of them. Of particular importance was the town of Le Quesnoy, the Sambre and Oise Canal and the Forest of Mormal. Although it has been pointed out that the thirty German divisions defending these positions were greatly under-strength, it should be noted that few of the twenty-one attacking British divisions were anywhere near their full strength either. Fortunately for the attackers, the British held the advantage in terms of artillery and could deploy tank and armoured car support. The mechanical units had suffered a good deal of attrition, but there were enough to play a useful ancillary role. Once again, the key to maximising the potential of these elements was identified in surprise, so in the days before the assault, the British artillery kept up its usual routine, and all preparatory activity was very well disguised. The autumn weather then brought its mixed fortunes. The low mist prevented useful aerial observation, but at the same time it helped to cloak the British troops. On the day of the assault, 4 November, the British were lucky that thick mist covered their initial advance, which then gave way to bright sunshine, allowing the air force to play a full part in operations.
It turned out to be another highly satisfactory day for Third and Fourth Armies. Le Quesnoy was taken in an impressive operation making elaborate use of Livens Projectors to throw cylinders of flaming oil at the ramparts and a carefully planned infantry envelopment covered by artillery. Patrols then pushed into the Forest of Mormal and found it deserted. A major achievement was the crossing of the Sambre and Oise Canal at a number of points. The 25th Division managed to straddle it using rafts, which then squeezed the Germans out of Landrecies, while 32nd Division led by its sappers had a fierce fight around Ors before securing a bridgehead. Across the front, German positions were prized open and the defenders thoroughly beaten, with around 10,000 taken prisoner.Footnote 60 Although the soldiers of the BEF did not know it, they had fought their last major battle of the war.
By 6 November 1918, Third and Fourth Armies realised that the German forces in front of them were in full retreat. The pursuit was maintained with the RAF’s V Brigade having a particularly intense time engaging enemy transport. However, the advance was by no means uniformly easy. German rearguards often made hard work for the British, and on 8 November, the German 9th Division managed to prepare and attempt a counter-attack. When this was beaten off, enemy resistance crumbled, and the Germans took to flight so intensely that all contact was lost. To the north, Plumer was having an equally hectic time trying to follow up on German withdrawals from the Schelde, while Birdwood’s Fifth Army pushed its cavalry patrols across the River Dendre. Famously, Canadian troops reached Mons late on the night of 10 November, thus bringing the BEF back to the spot where it started the war. At 11 AM the next day, the Armistice came into effect.
By the end of October, Germany and its armed forces were disintegrating. Forced to withdraw aid from its dependent allies, it was powerless to stop them breaking away to sign separate armistice agreements with the entente forces. Mutiny broke out in the Kiel naval base, and after inspecting the troops along the Western Front, Ludendorff’s replacement, General Wilhelm Groener, recommended immediate negotiations with the entente before utter collapse. At the same time, President Woodrow Wilson informed the German government that Foch had been authorised to discuss armistice terms on behalf of the coalition powers. When the two sides met in a railway carriage at Compiègne on 8 November, Foch made no attempt to negotiate and instead dictated terms. The German Army was given the dignity of returning with its small arms and officers their swords, but all artillery was to be abandoned, the allies were to take bridgeheads over the Rhine and the naval blockade was to be maintained to ensure compliance. Deeply perturbed, the German delegates reported back to the new German Chancellor, Prince Max of Baden. Desperate to stabilise the situation and smooth internal and external relations, Max unilaterally declared the abdication of the Emperor but did so in the immediate aftermath of his ministry’s collapse. The Armistice would now come into effect with a new German government in place. But, at this point, the position of the Emperor was still uncertain, despite the new government reinforcing Max’s statement by declaring Germany a republic. Wilhelm had already turned his back on civilian leaders, having taken the decision to consult with military headquarters. And it was Hindenburg and Groener who now advised him that the overwhelming opinion of the army was that he should indeed abdicate or else run the risk of open civil war in Germany. Revealing uncharacteristic humility and self-effacement, Wilhelm accepted the advice and agreed to leave for exile in the Netherlands. A response to the Armistice terms was now the first task of Frederich Ebert, first president of the new German republic, and he rapidly realised that he had no option other than to accept them. The German delegates at the front then duly signed the Armistice documents at 5:05 AM, which came into effect at 11:00 AM. Hostilities on the Western Front fizzled out with British troops going about their usual routines in a spirit of intense anti-climax.
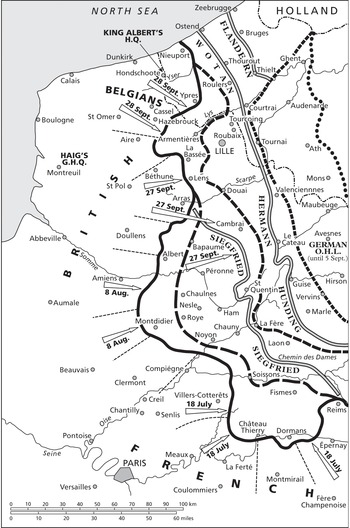
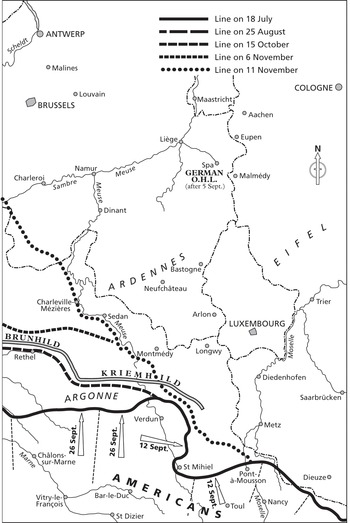
Map 13 Allied advances (‘The 100 Days’), July–November 1918
By playing a major role in bringing about the Armistice, the high command of the German Army saved itself the extreme humiliation of utter disintegration in the field. Some entente generals, most notably Pershing and Mangin, argued that even this scintilla of dignity was too much and wanted a vigorous pursuit to the end. Two reasons militated against such a conclusion. First was the ability of entente logistics to maintain the offensive, for although the American, British and French armies had immense resources in terms of weapons, ammunition and (thanks to the Americans) manpower, all the coalition forces had strained their logistics systems to their utmost by November. Second was that by the autumn of 1918 the politicians and home fronts of both Britain and France were desperate to end the hardships forced by war, and sacrificing more of their soldiers in order to emphasise the scale of their victory seemed pointless.
The role of the BEF in the final advance to victory was considerable. Of the 385,500 Germans taken prisoner by the Americans, Belgians, British and French, the BEF took 188,700. The number of guns captured by the BEF was equally impressive, consisting of 2,840 from the 6,615 taken in total.Footnote 61 However, this disguises the American effort somewhat as a number of US Divisions fought as part of the British Armies. These figures also need to factor in the immense efforts of the Dominion divisions. The Australian and Canadian corps brought in a combined total of 54,391 prisoners, or just over a quarter of the BEF’s total. The Canadian Corps had a particularly impressive end to the war. Having avoided major action in the German spring offensives, it was in a perfect position to reveal the strengths forged through years of internal cohesion and consistency of approach. In contrast, the Australian Corps was heavily involved in fierce defensive action and was, quite understandably, running out of steam by the autumn. At the same time, the New Zealanders and South Africans continued to perform to high standards despite operating in the interchangeable British corps system. Praise for Dominion units should not be taken as a sign that British divisions were failing to pull their weight. Most British divisions had fought to the point of exhaustion during the spring offensives and were being hurriedly reconstituted with raw conscripts at the point the advance commenced. The rapid integration of these troops and their ability to play a part, no matter how imperfect or partial, in the eventual victory is a tribute to the flexibility of the BEF’s teeth units.
Using casualties as an indicator of military effectiveness is extremely difficult due to the impossibility of creating useful comparative statistics. On the surface, the figures look good for the Germans. On 21 March 1918, they suffered the usual experience of the attackers on the Western Front – their casualties exceeded those of the British defenders standing at 39,929 and 38,152, respectively. But thereafter the Germans bucked the trend. During the whole of Operation Michael the Germans suffered 239,800 casualties compared with 254,739 inflicted on the British and French.Footnote 62 This trend continued across the remaining German offensive efforts. But from mid-July and the resumption of the offensive by the entente forces, it becomes less easy to determine whether the usual pattern returned, for there is a welter of statistics with overlapping census dates. Taking the period August–October 1918, it can be determined that the Germans achieved a net advantage of 35,500 combat fatalities over the British. Therefore, it seems highly likely that the German Army re-imposed the Western Front orthodoxy until the Armistice. The re-emergence of this trend can be taken as evidence of the remarkable resilience and enduring professional standards of the German Army. But the inability to draw simple conclusions from casualty statistics is revealed when prisoners are factored in. German soldiers surrendered in vast numbers by the summer of 1918. In the last four months of the war, the BEF took almost as many prisoners as it had in the previous four years. Attributing this willingness to surrender to British military efficiency alone is, of course, highly problematic. By the same token, the impact of the BEF’s steady, remorseless advance should not be discounted lightly. The experience of being pursued doggedly by a determined, well-supplied, competent foe must have been extremely demoralising for the exhausted German soldiers, especially as their leaders had so often belittled the quality of the BEF. Thus, the extent to which the German Army was a far from defeated force at the Armistice can be questioned. Although it can be argued that the German Army was defeated from within by the mental collapse of its high command, the fact remains that fewer and fewer German soldiers were prepared to make a determined stand by late October 1918, and the British-led entente advance was capable of dealing effectively with the last pockets of resistance.
The British forces on the Western Front had shown quite remarkable skill and imagination, which raises the issue of the considerable historiographical debate surrounding the British achievements in the ‘Hundred Days’ from 8 August to 11 November 1918. Broadly speaking, while some historians have focused variously on either operational or tactical improvements in British performance, others have stressed German failure as the greater factor in allied success. While operational explanations of British success have emphasised such factors as decentralisation of command, logistics and superiority of materiel, tactical explanations have embraced both the emergence of combined arms techniques and, alternatively and paradoxically, the significance of individual arms of service. Explanations resting on German failure, while equally varied, tend to condemn the BEF for continuing conservatism.Footnote 63 To all this must be added the greater co-ordination of allied armies following Foch’s appointment and the abandonment of the idea of wider strategic objectives in favour of Foch’s bataille général of a series of limited and localised attacks over a wide front that unlocked the deadlock and forced the Germans back.
There has been some emphasis upon the emergence of combined arms as a significant factor in British success and, indeed, of the emergence of ‘modern battle’.Footnote 64 In reality, it is clear that this was by no means uniform across the BEF. Edmonds, indeed, was correct in suggesting that the Hundred Days consisted of a combination of more traditional set-piece attacks on well-prepared defensive positions, attacks on field positions in semi-mobile conditions and outright pursuit. In the case of Third Army, for example, of 202 opposed attacks; not one saw the employment together of infantry, artillery, machine guns in close support or barrage, gas, tanks, cavalry and ground-attack aircraft. Cavalry appeared in just two attacks, gas in five, RAF ground attack in six, machine guns in forty and tanks in fifty. Infantry, however, were supported by artillery on 186 occasions.Footnote 65 Despite remaining an artillery-led force, the BEF’s infantry proved that it was by no means simply an adjunct to heavy fire power. The 1918 offensives revealed that the infantry was capable of advancing with relatively few significant artillery assets. This was partly to do with the changing nature of the battlefield. In essence, the semi-open warfare experienced in the later stages of the 1916 and 1917 battles was the norm in the late summer of 1918. With the army on the march, the infantry had to survive with fewer large-scale, heavy bombardments and work their way forward supported by only immediate covering fire. This often required the infantry to deploy its full range of organic fire power assets from Lewis guns (which numbered thirty per battalion by July 1918) to rifles grenades (at least sixteen per battalion) while calling upon the close support of mortars and field artillery. With the Germans occupying scattered positions, the infantry had to consider even more closely the issues of outflanking and fire and movement. In defence and attack, the BEF required its infantry to show imagination, flexibility and dogged determination. Fortunately, the latter quality was often shown by both veterans and fresh conscripts. In terms of sophistication, the BEF certainly had an excellent blueprint in its training manuals, and it possessed equally good weapons in abundance by 1918, but it was continually undermined by the inability to ensure an overall quality in training and impart a cohesive, over-arching understanding of the infantry battle.
While it has been fashionable to stress the greater flexibility and skills of Dominion divisions, and notwithstanding contemporary criticism of the British by some Australian commanders, British infantry divisions generally stood up well to the challenges. After all, of sixty active divisions involved between August and November 1918, only ten were from the Dominions. Certainly, the standard of junior leadership was far better than the Official History later claimed, Edmonds’s regular army prejudices perhaps coming to the fore when the decentralisation of command had unsettled older regulars.Footnote 66 It is also clear that the mix of surviving veterans and inexperienced conscripts did not impair the ability of the BEF to adapt. Indeed, it has been suggested that conscripts ‘ignorant and easily killed though they often were, blended with natural leaders to keep the show going’.Footnote 67
Adjusting to this form of warfare on a grand scale, however, was difficult given earlier experiences. British infantry units often remained obsessed with secure flanks and were not always comfortable with the concept of pushing on when neighbouring units appeared to be hung up or slowing down. It is difficult to be too condemnatory of such hesitation given the nature of the fighting in the great trench battles, but it also reveals once again the inability of the army to impose a cohesive, uniform training doctrine. This issue does appear to have been recognised, for in the spring of 1918 Maxse was appointed the Inspector of Training, replacing the former GHQ Directorate of Training. Considering that this had been in existence since 1916, its failure to set a consistent standard must be interpreted as either a black mark against its head, Brigadier-General Arthur Solly-Flood, or an indictment of British military culture. In fact, Solly-Flood had played an important role in overseeing the reorganisation of infantry platoons in 1917 and in restructuring the training system.Footnote 68 SS135, Instructions for the Training of Divisions for Offensive Action, was reissued in January 1918 as The Training and Employment of Divisions, 1918. It had several new features, including less emphasis upon hard and fast rules. It has been argued that a blend of it with the pre-war Field Service Regulations I made a significant base for the kind of operational and tactical flexibility that occurred in the Hundred Days.Footnote 69
The difficulty, as always, lay in the varied nature of training within different formations and the diversity of command approaches. Pressure of events constrained training opportunities after March 1918, with the increasing tempo of operations militating against Maxse’s efforts.Footnote 70 The combination of the beefed-up post in the form of an Inspectorate and the strength of Maxse’s character opened up the way for a new attitude towards training, but the war ended before its work had matured, and it is therefore impossible to judge its impact. Such weaknesses should temper any unconditional praise of the BEF in the final stages of the war. Irrespective of the attempts to bring about uniformity, however, decentralisation of, and flexibility in, command styles was undoubtedly helpful in allowing commanders to adapt to different circumstances and the increasing tempo, a result nicely characterised by Tim Travers as ‘useful anarchy’.Footnote 71 Much depended, of course, upon the quality of leadership at battalion, brigade and divisional levels, and the emergence of younger commanders was significant: Roland Boys Bradford VC became a brigade commander (186th Brigade) at just twenty-five in November 1917, and Hugh Keppel Bethell became a divisional commander (66th Division) at thirty-five in March 1918. While these were exceptions, the average age of divisional commanders fell from fifty-five in August 1914 to forty-nine in November 1918.Footnote 72 In any case, centralisation had had limited appeal to those used to the pragmatism of the old regular army and ‘the flexibility and professionalism that prided improvisation and empirical lessons drawn from experience, both past and immediate, over-elaborate doctrine and exhortation’.Footnote 73 Generally, it has been argued that divisional commanders were more and more important with both corps and army commanders less so, army commanders like Rawlinson even being largely spectators.Footnote 74 Clearly, there was increasing delegation to subordinate commanders, although, as with much else, there was little actual consistency in whether delegation resulted from top-down or bottom-up initiatives. This suggests continuing unevenness in any ‘learning curve’.Footnote 75
At the forefront of the BEF’s advance to victory, too, was its artillery. By 1918, artillery fire could be adjusted according to temperature, the charge used, the velocity and direction of the wind, the age and wear of the gun and the type of shell and fuse.Footnote 76 Moreover, the techniques of sound ranging and flash spotting were fully developed. Despite the fact that advancing infantry often outstripped the ability of the heavy guns to keep pace, the BEF still found that it needed as many guns as it could muster. The fluid pace of operations in both defence and attack in 1918 often placed much more emphasis on the rapid deployment of horse artillery in conditions much closer to those conceived in pre-war thinking. Lengthy barrages were simply not needed where the German defences were weak, the able artilleryman, Herbert Uniacke, in his capacity as Deputy Inspector General of Training, rushing out a series of new leaflets to encourage direct support for the infantry.Footnote 77 But, whenever the BEF came up against strongly held, well-prepared enemy positions, it found that it could not do without its heavy artillery. The attempt to take the Quadrilateral on 18 September was a notable example of an assault made on an elaborate enemy strong point which came to grief due to inadequate heavy artillery preparation. In this instance, the organic fire power and tactical skills of the attacking infantry were of little value without the vital support of a well-planned and well-executed heavy bombardment. The difficulties of keeping heavy artillery in action in rapidly changing circumstances were partially offset by the increasing use of gas shells. Although the British and French produced gas that was inferior to that of the Germans, their own variants proved to be sufficient against poor German gas masks. The increasing availability of gas shells and gas projectors then allowed the British to cover both their retreats and advances more effectively.
As has been noted, much of the success of the BEF in 1918 was due to its logistical strength. Committed to an artillery war, the BEF’s logistics staff used artillery ammunition as the vital yardstick for its operational requirements. The emphasis on using artillery expenditure as the measurement of logistical endurance then made the BEF’s operations less impressive in terms of ground gained than the German advances of the spring but far more secure and far less susceptible to counter-attack. The downside of this approach meant a loss of operational tempo, which often allowed the Germans to retreat in relatively good order, giving them time to block and destroy communications. Between August and November, for example, the Royal Engineers erected over 330 stock-span or rolled-steel-joint bridges over watercourses, or double the number erected in the previous four years of static warfare.Footnote 78 The logistical flexibility achieved by such efforts allowed Haig to switch positions almost at will, as noted, and thus ensured constant pressure on the German front. Maintaining the advance then placed great stress on the system, particularly once the railheads were left well in the rear. This put the emphasis onto motor lorries, which strained hard to deal with autumn conditions of greasy roads, fog, rain and drizzle. Nevertheless, lorries proved an invaluable link in the chain and their numbers increased enormously during the course of the conflict rising from 334 in 1914 to 33,560 by 1918.Footnote 79
Understanding the nature of British thinking on logistics and the way it supported front-line operations has therefore got to be taken into account in any assessment of the supposedly greater quality of German tactical thinking and the extent to which the Germans were undefeated by the Armistice.
Improved communications also played its part, although there were still significant difficulties. To supplement earlier reliance upon telegraph and telephone, wireless had become more widespread by 1917 with the introduction of the British Field (BF) Trench Set, the Loop Set, and the Wilson Set, although all relied on spark technology and were vulnerable to damage and interference. Continuous-wave sets had then been introduced in 1917 but were largely confined to artillery counter-battery work. SS148, Forward Intercommunications in Battle, encapsulated lessons thus far learned in March 1917. More mobile operations in 1918 posed different problems: forty pigeon lofts were lost in March 1918, for example, with some corps exchanges trying to maintain links with multiple divisional headquarters along single cables. Advancing was potentially less of a problem in that cables did not have to be buried as consistently given the absence of German artillery, and wires could be salvaged more easily. Breakdown was still a reality, however, as at Epéhy on 18 September 1918. Nonetheless, communications were far more robust and flexible than before.Footnote 80
These systems connected the key teeth-arms of the BEF, infantry and artillery, with their ancillaries in the form of tanks, armoured cars, aircraft and cavalry by 1918. Aircraft were vital in reconnaissance and performed an increasingly significant ground-assault role that was often extremely useful for the infantry. Their efficiency, however, was increasingly adversely affected by bad weather. Tanks and armoured cars could also support the infantry effectively, although they never became the cutting edge of the BEF’s assaults. Despite being in demand, their lack of mechanical reliability meant that they were by no means a panacea providing a powerful shield for the precious infantry, which often infantry attacked without much in the way of tank support.
At Amiens, 414 tanks – mostly the improved Mark V – started on 8 August, but only thirty-eight were available on 11 August and only six on 12 August. Even the newest and most improved types of tank had significant weaknesses as weapons of breakthrough and exploitation. The Mark V had a speed of only three miles per hour and a range of twenty-five miles. The Whippet (Medium A) could reach 8.3 miles per hour but could cross only narrow trenches. Tanks therefore remained best suited to supporting infantry in set-piece attacks, especially as the distance they were required to cover before reaching the point of attack had expanded from perhaps a mile in August to over twenty miles in November.Footnote 81 Apart from chronic mechanical unreliability, tanks remained vulnerable to artillery, armour-piercing machine gun rounds, and anti-tank rifles, while crews were still exposed to heat exhaustion, noise, and carbon monoxide poisoning. In addition, reserve crews were in short supply, with human losses in the Tank Corps amounting to 40 per cent between August and November 1918. But spares were also lacking because the emphasis had been given to production of tanks per se rather than keeping existing machines serviceable. Salvage was certainly possible, and some individual tanks were in action up to fifteen times, but tanks and armoured cars could not be kept running in large numbers indefinitely. Of the tanks available on 8 August 1918, some 55 per cent had been lost by 20 October.Footnote 82
However, there is some discrepancy in the figures given for the number of tanks available at any given time since, while some tanks were being salvaged or repaired, others were in reserve or being used for training purposes. Indeed, it has been argued that tanks were more durable than usually assumed, with 800 salvaged between August and November, and could have been used much more effectively. Thus, there was an essential conservatism informing GHQ’s conclusion in August 1918 that tanks were only ‘a mechanical contrivance’.Footnote 83
It is hard to quarrel, however, with the judgement of SS214, Tanks and Their Employment in Co-operation with Other Arms, which conceded in August 1918 that the tank was far from perfect in a technical sense.Footnote 84 What is apparent is that tanks became more scarce, the number of attacks made with their assistance steadily declining even though attacks with tank support enjoyed a high success rate. In the Third Army, for example, the number of attacks supported by tanks decreased from an average of over twenty-five with over ten tanks participating between 21 August and 3 September to fewer than five attacks and fewer than five tanks participating by 4 November.Footnote 85
Like tanks and armoured cars, the value of cavalry is difficult to discern easily. At times it played an important role supporting the infantry, particularly in defence, and then acted as a weapon of exploitation from 8 August onwards and was certainly much in demand by the last few weeks of the war. It was hardly the fault of the cavalry that its manpower and horses had been whittled down so much by this point that it was unable to perform all of its allotted tasks evenly: it has been suggested that the entire Cavalry Corps had fewer men in late 1918 than the 1st Cavalry Division in 1914. More disconcerting for British command procedures was the fact that liaison between the cavalry and tank forces was minimal, which meant that the potential of these two arms to collaborate on the battlefield was not realised.Footnote 86
The combination of structural weaknesses and rapidly changing circumstances meant that the BEF was never able to deploy all of its arms evenly in 1918. It therefore failed to develop anything like a unified approach to battle in which elements were neatly matched and balanced to produce maximum impact for most efficient input. Army and corps commanders were often forced to improvise with whatever they had to hand, reassured by the certainty that these components would not be undermined by insurmountable logistical difficulties. Nonetheless, this still translated into a high degree of combat effectiveness. In the Hundred Days, ground won stayed won, and moreover, the ground was of increasing strategic importance. As the BEF overran defensive systems, it successively opened up the Germans to defeat on a broad front and allowed them no respite even if the operational tempo was moderate rather than rapid. In 1918, the BEF experienced many scares and close-run things before playing the major role in the entente’s victory. Haig, his GHQ, armies, corps and divisions put on a team effort to achieve victory, and as in any good team, this did not necessarily mean brilliance at every level but the ability to show enough quality, consistency and cohesion to iron out weaknesses and maximise strengths.
